Showing posts with label Ascential DataStage:Design. Show all posts

Thursday, January 26, 2012

Set up ODBC Connection For IIS DataStage (v.8.5)

Configure Access to ODBC Data Source For IIS DataStage (v8.5, Window Server)

Thie following information can also be found here.

From the Engine Tier;
· Launch the dos Prompt as Adminstratior
· Change to cd c:\windows\syswow64
· Lounch odbcad32.exe

 
     C:\Windows\SysWOW64>odbcad32.exe


· Select a ODBC driver that you want to use, for example, SQL server. Make sure to only use drivers that are provided by IBM


· Define the DSN Connection by select the System DSN tab, then select ADD. Give the DSN a name, and provide the server, user id and password. You can also specify a default database.

 
When you are done, make sure to test the connection. It all is fine, you should be able to see the DSN from the IIS components such as DataStage or Information Analyzer.

 
Related Note:


Wednesday, June 13, 2007

Ascential DataStage: Routine to Reset Sequnce Key

If you use the KeyMgtGetNextValue routine in your job to assign a sequence value for you key, and you want to set the key to a special value, there is no routine come with DataStage for you to reset the key. You need to create one for your own.


1. Login to your project from DataStage Manager.
2. Select File àNew Server Routine
3. From the SDK editor, select the General tab and do:
4. Give a routine name, for example: SetKeyValue, in the Routine name field.
5. Select Transformer Function from Type list.
6. Select or enter a Category in the Category field.
7. Enter a short and long descriptions as you wish
8. Select the Arguments Tab and enter two arguments
---- SeqKeyName this is the name associated with the sequence.
---- KeyValue. This is the value you want to set for your key.
9. Select the Code Tab and place the following codes in the code window.
Common /Sequences/ Initialized, NewVal, SeqFile
## open the SDKSequence file
Open "SDKSequences" TO SeqFile Else
EXECUTE "CREATE.FILE SDKSequences 2 1 1"
Open "SDKSequences" TO SeqFile
Else Call DSLogFatal('Unable to Open Sequence file','Reset Sequence Job')
End
## Write the new value to the file
NewVal = KeyValue
Writeu NewVal ON SeqFile,SeqKeyName
Else Call DSLogFatal('Unable to write New Value','Reset Sequence Job')
## return the values
Ans = NewVal
10. Select Compile from the bottom of the screen and make sure there is no error.
11. Select Test from the bottom of the screen and test the Routine. It should return the value of KeyValue.
12. To reset the key using the routine you just created, create a new job from the designer. In your job, user a transformer to trigger the routine.


Saturday, September 30, 2006

Ascential DataStage: Containers For Server Edition

A container, as its name indicates, is used to group stages and links. Containers help simplify and modularize server job designs and allow you to replacing complex areas of the diagram with a single container stage. For example, if you have a lookup that is used by multiple jobs, you can put the jobs and links that generate the lookup into a share container and use it to different jobs. In a way, you can look at it like a procedure or function in the programming term.

Containers are linked to other stages or containers in the job by input and output stages.

Two types of container:

1. Local containers. These are created within a job and are only accessible by that job. A local container is edited in a tabbed page of the job’s Diagram window. Local containers can be used in
server jobs or parallel jobs.

2. Shared containers. These are created separately and are stored in the Repository in the same way that jobs are. There are two types of shared container:

(1.) Server shared container. Used in server jobs (can also be used in parallel jobs).

(2.) Parallel shared container. Used in parallel jobs. You can also include server shared containers in parallel jobs as a way of incorporating server job functionality into a parallel stage
(for example, you could use one to make a server plug-in stage available to a parallel job).

For here, I only tested the Server Jobs so I only put notes on the server jobs now. Parallel
Jobs works differently. Will note on it as a separate topic.

1 Local Container

The main purpose of using a DataStage local container is to simplify a complex design visually to make it easier to understand in the Diagram window. If the DataStage job has lots of stages and links, it may be easier to create additional containers to describe a particular sequence of steps.

To create a local container, from an existing job design, do the following:

(1.) Press the Shift key and using the mouse to click on the stages that you want to put into the local container.

(2.) From the Menu bar, select Edit ➤ Construct Container ➤ Local.

The group is replaced by a Local Container stage in the Diagram window. A new tab appears in the Diagram window containing the contents of the new Local Container stage. You are warned if any link naming conflicts occur when the container is constructed. The new container is opened and focus shifts onto its tab.

You can rename, move, and delete a container stage in the same way as any other stage in your job design.

To view or modify a local container, just double-click container stage in the Diagram window. You can edit the stages and links in a container in the same way you do for a job.


To create a empty container to which you can add stages and links, drag and drop the Container icon in the General group on the tool palette onto the Diagram window.

A Container stage is added to the Diagram window, double-click on the stage to open it, and add stages and links to the container the same way you do for a job.

1.1 Using Input and Output Stages in a local container

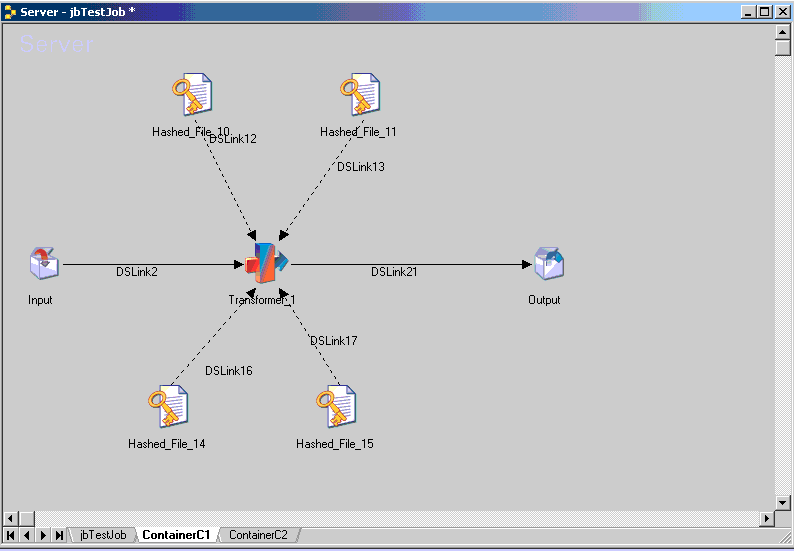
Input and output stages are used to represent the stages in the main job to which the container connects.


-- If you construct a local container from an existing group of stages and links, the input and output stages are automatically added. The link etween the input or output stage and the stage in the container has the same name as the link in the main job Diagram window.

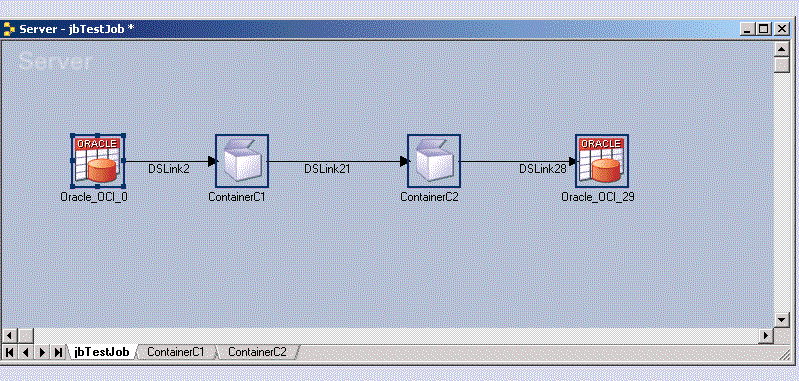
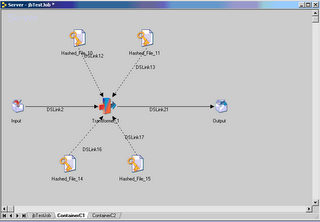
In the example above, the input link is the link connects to the container from the main job’s Oracle_OCI stage (oracle_oci_0). The output link is the link that connects to the second container from the first container.

-- If you create a new container, it will place the input and output stages in the container without any link. You must add stages to the container Diagram window between the input and output stages. Link the stages together and edit the link names to match the ones in the main Diagram window.

You can have any number of links into and out from of a local container, all of the link names inside the container must match the link names into and out of it in the job. Once a connection is made, editing meta data on either side of the container edits the meta data on the connected stage in the job.

2 Share Container

Shared containers also help you to simplify your design but, unlike local containers, they are reusable by other jobs. You can use shared containers to make common job components available throughout the project.

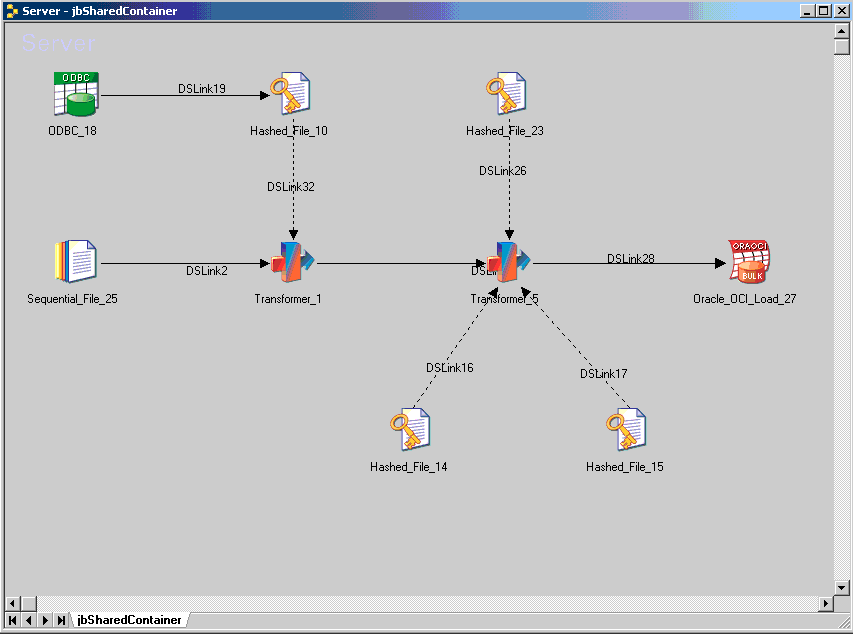
Shared containers comprise groups of stages and links and are stored in the Repository like DataStage jobs. When you insert a shared container into a job, DataStage places an instance of that container into the design. When you compile the job containing an instance of a shared container, the code for the container is included in the compiled job. You can use the DataStage debugger on instances of shared containers used within jobs.

You can create a shared container from scratch, or place a set of existing stages and links within a shared container.

2.1 Create a shared container from an existing job design

(1.) Press Shift and click the other stages and links you want to add to the container.


(2.) From the Menu bar, select Edit ➤ Construct Container ➤ Shared. You will be prompted for a name for the container by the Create New dialog box. The group is replaced by a Shared Container stage of the appropriate type with the specified name in the Diagram window.


Any parameters occurring in the components are copied to the shared container as container parameters. The instance created has all its parameters assigned to corresponding job parameters.

(3.) Modify or View a Shared Contained

Select File ->Open from the Menu bar and select to Shared Container that you want to open. You can also highlight the Shared Container and use right mouse click and select property.

2.2 User A Shared Container

(1.) Dragging the Shared Container icon from the Shared Container branch in the Repository window to the job’s Diagram window.

(2.) Update the Input and Output tabs.

-- Map to Container Link.
Choose the link within the shared container to which the incoming job link will be mapped. Changing the link triggers a validation process, and you will be warned if the meta data does not match and are offered the option of reconciling the meta data as described below.

-- Columns page
Columns page shows the meta data defined for the job stage link in a standard grid. You can use the Reconcile option on the Load Shared Containers button to overwrite meta data on the job stage link with the container link meta data in the same way as described for the Validate option.


Monday, September 11, 2006

Ascential DataStage: Linux Sendmail and Notification Activity

To understand how to use the Notification Activity in a Linux environment, it is helpful that we review the basic of the Linux Sendmail command.

1. Lunix Sendmail Command

The sendmail package is normally located in /usr/sbin/. If you are not sure where it is located, you can use the which command to find out:


# which sendmail
/usr/sbin/sendmail

The syntax for sendmail is:

Sendmail [flags] [address ...]

There are many flags you can apply with sendmail. You can always find them from the man page. The address is the recipient’s address.

If you want to send a message from the Linux command line, you can just simply type:

Sendmail receipents-email-address
enter body of message
CTRL-D

Receipents-email address is the email address you want to the email to go to. For example, joe@domain.com. After you press enter, you can enter the email message. When you are done with your email message, press CTRL-D to send the message.

By sending the message from the commend line, the message will include your login id as in the From: line; moreover, the message is missing a useful TO: line and it does not give you the option to include a Subject line. To include the To: line and Subject line in your message, you need to create a txt file. Following is an example of the text file:

To: reciepient@domain.com
Subject: Email subject
From: sender@domain.com

message body here

To send the message, you can type:

#/usr/sbin/sendmail -t -i < mail_msg.txt

The –t option tells sendmail to read the email header information from the input file mail_msg.txt. The –i option is used to tells sendmail to ignore dots alone on lines by themselves in incoming messages. This should be set if you are reading data from a file.

2 The dssendmail_template.txt File

By default, DataStage place a file called dssendmail_template.txt in each project directory (folder). This file is used as a template to generate a script, which a name likes sendmail_loadjob56334_5532.sh in Linux or UNIX, to send message from the dat astage server. The default is set for using sendmail in UNIX.

#!/bin/sh
/usr/lib/sendmail -t <<////
From: %from%
To: %to%
Subject: %subject%
%body%
////

In runtime, the variables are substituted by the variables which are provided in the Notification Activities or the parameters passed to the DSSendMail routine. The dssendmail_template.txt has the detail explanations on how the tokens are recognized in the template as well as how to set up the template to using with window or NT system. DataStage Engine; actually, recognize two file names. The engine will first look for a file called "dssendmail.txt". If it dose not exist, it will use the "dssendmail_template.txt". This allows for local customization and prevents dssendmail.txt override by DataStage re-install. You can have a template file for each project. This allows you to have different Notification email formats for different projects. It is also possible to use different email packages, such as mail, to send mail. This is an example dssendmail.txt file:

#!/bin/sh
/usr/sbin/sendmail -t -i <<////
From: %from%
To: %to%
Subject: %subject%
%body%
////

3. Notification Activity

The fields in the Notifications page of the Notification Activity correspond to the tokens in the template file. If your particular template does not use a particular field, then setting it in the Notification page has no effect. For example, UNIX Systems generally require you to specify a Senders email address whereas Windows systems do not. So specifying this field may be mandatory in a UNIX system, but have no effect in a Windows system.

The Notification page contains:

• SMTP Mail server name. The name of the server or its IP address.
• Senders email address. Given in the form prodmonitor@domain.com.
• Recipients email address. The address the email is to be sent to, given in the form of admin@domain.com


• Email subject. The text to appear as the email subject.
For all the above, you can specify a parameter whose value will be specified at run time. Click the Browse button to open the External Parameter Helper, which shows you all parameters available at this point in the job sequence. Parameters entered in these fields need to be delimited with hashes (#). Parameters selected from the External Parameter Helper will automatically be enclosed in hash symbols.

• Attachments. Files to be sent with the email. Specify a path name, or a comma-separated list of pathnames (in the latter case this should be contained in single-quotes or double-quotes). You can also specify an expression that resolves to a pathname or commaseparated pathnames. The Arrow button offers you the choice of
browsing for a file or inserting a job parameter whose value will be supplied at run time. Again, parameters entered in these fields need to be delimited with hashes (#). Parameters selected from the External Parameter Helper will automatically be enclosed in hash symbols.

• Email body. The actual message to be sent. (Do not enclose the message in inverted commas unless you want them to be part of the message.)

• Include job status in email. Select this to include available job status information in the message.

• Do not checkpoint notification. Set this to specify that DataStage does not record checkpoint information for this particular notification operation. This means that, if a job later in the sequence fails, and the sequence is restarted, this notification operation will be reexecuted regardless of the fact that it was executed successfully before. This option is only visible if the sequence as a whole is checkpointed.